TF gatewaylessの経路をVyOSに配布
Tungsten Fabric (以下、TF) のgatewayless では、vrouter 上に存在し、ip fabric forwarding が有効になっているvmi (通常は、コンテナを想定) について、その経路を、bgp (family inet) で配布する機能がある。
https://github.com/Juniper/contrail-specs/blob/master/gateway-less-forwarding.md
このため、vrouter と同じセグメントのルーター (vrouterのデフォルトゲートウェイを想定) に対して、peer を張ることで、ルーターとコンテナの間で、直接ping が飛ぶようにすることが出来る。
※ 以前のブログでは、/32 で static route を定義していたが、bgp で経路を渡せるようにしておけば、経路を個別に定義する必要は無くなる
http://aaabbb-200904.hatenablog.jp/entry/2018/05/14/003319
準備として、前回同様、k8s+TF の環境をaws上に構築し、default-k8s-pod-network に ip fabric forwarding の設定を行っておく。
この後、上記の k8s master / slave と同じサブネットに、vyos (ami-6946f70f) のインスタンスを作成する。
※ t2.small (1 cpu, 2 GB mem), 4GB disk を指定
※ TF controller: 172.31.11.86, TF vrouter: 172.31.2.194, vyos: 172.31.10.140 の環境を使用
vyos が起動してきたら、以下のように、TF controller とのbgp設定を実施しておく。
# set protocols bgp 65311 neighbor 172.31.11.86 remote-as 64512
上記の設定が終わったら、TFのwebui の Configure > Infrastructure > BGP Routers から、以下の画面のように、BGP の定義を作成する。
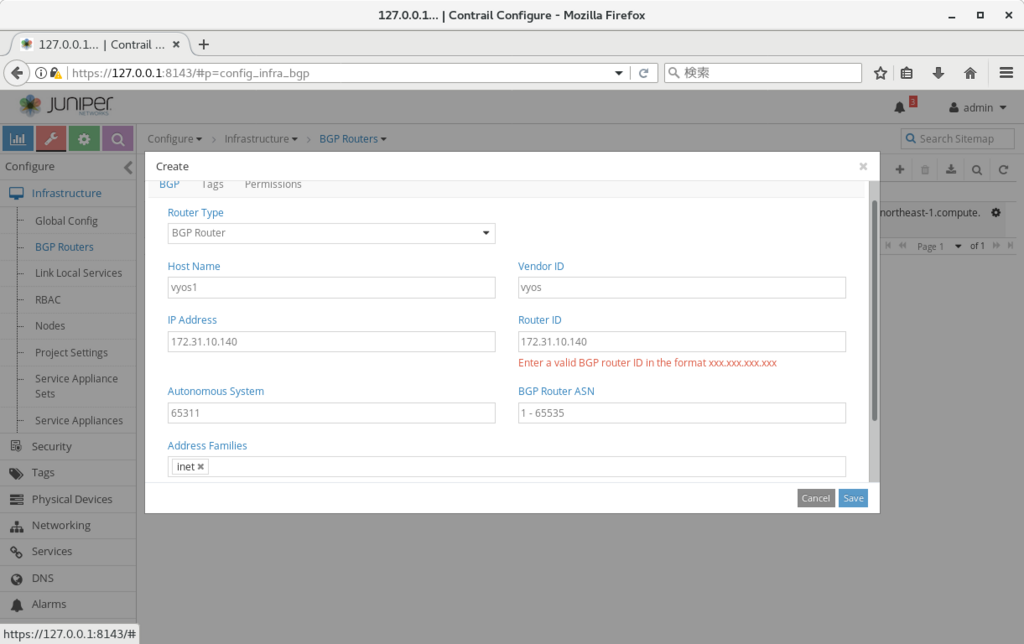
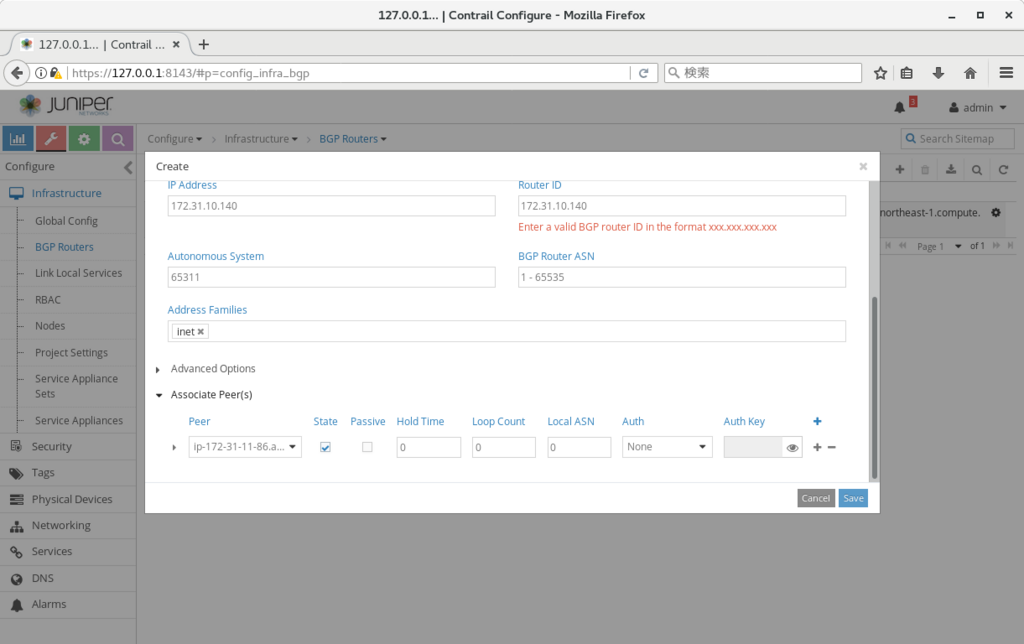
設定が終わった後、vyos に戻って、bgp が上がってくることを確認する (上がってくるまで 45秒-1分程度かかった)
vyos@VyOS-AMI:~$ show ip bgp summary
BGP router identifier 172.31.10.140, local AS number 65311
IPv4 Unicast - max multipaths: ebgp 1 ibgp 1
RIB entries 5, using 480 bytes of memory
Peers 1, using 4560 bytes of memory

Neighbor        V    AS MsgRcvd MsgSent   TblVer  InQ OutQ Up/Down  State/PfxRcd
172.31.11.86    4 64512      14      13        0    0    0 00:00:08        3

Total number of neighbors 1
vyos@VyOS-AMI:~$
vyos 上でbgp の経路を確認すると、以下のようにコンテナへの経路 (next-hop は vrouter のip) が流れてきており、bgp inetでの経路配布が、正しく行われていることが確認出来る。
vyos@VyOS-AMI:~$ show ip route
Codes: K - kernel route, C - connected, S - static, R - RIP, O - OSPF,
       I - ISIS, B - BGP, > - selected route, * - FIB route

S>* 0.0.0.0/0 [210/0] via 172.31.0.1, eth0
B>* 10.47.255.250/32 [20/100] via 172.31.2.194, eth0, 00:00:30
B>* 10.47.255.251/32 [20/100] via 172.31.2.194, eth0, 00:00:30
B>* 10.47.255.252/32 [20/100] via 172.31.2.194, eth0, 00:00:30
C>* 127.0.0.0/8 is directly connected, lo
C>* 172.31.0.0/20 is directly connected, eth0
vyos@VyOS-AMI:~$
また、この状態で、コンテナからvyosに対してping が飛ぶことを確認出来る。
※ 前回同様、aws上の ネットワーク&セキュリティ > インターフェース、の定義で、"送信元・送信先の変更チェック"、を無効にする必要があるので注意 (vrouter 用のec2インスタンスに対して実施する必要あり)
/ # ip -o a
1: lo: <LOOPBACK,UP,LOWER_UP> mtu 65536 qdisc noqueue qlen 1000\    link/loopback 00:00:00:00:00:00 brd 00:00:00:00:00:00
1: lo    inet 127.0.0.1/8 scope host lo\       valid_lft forever preferred_lft forever
1: lo    inet6 ::1/128 scope host \       valid_lft forever preferred_lft forever
11: eth0@if12: <BROADCAST,MULTICAST,UP,LOWER_UP,M-DOWN> mtu 1500 qdisc noqueue \    link/ether 02:dd:9c:4e:dc:6b brd ff:ff:ff:ff:ff:ff
11: eth0    inet 10.47.255.251/12 scope global eth0\       valid_lft forever preferred_lft forever
11: eth0    inet6 fe80::c0cd:54ff:fefc:4ce0/64 scope link \       valid_lft forever preferred_lft forever
/ #
/ #
/ # ping 172.31.10.140
PING 172.31.10.140 (172.31.10.140): 56 data bytes
64 bytes from 172.31.10.140: seq=0 ttl=63 time=0.762 ms
64 bytes from 172.31.10.140: seq=1 ttl=63 time=0.529 ms
^C
--- 172.31.10.140 ping statistics ---
2 packets transmitted, 2 packets received, 0% packet loss
round-trip min/avg/max = 0.529/0.645/0.762 ms
/ #
ネットワーク分離の要件が無い、等の理由で、オーバーレイを使う必要がない環境では、上記の構成を検討してみるのもよいのではなかろうか。
プロキシ環境下でのTungsten Fabricインストール
プロキシ環境で、Tungsten Fabric (以下、TF) をインストール出来るか、について確認した際のまとめとなる。
※ 確認時には、k8s との組み合わせで試したので、openstack インストールの場合には、また別の設定が必要になるかもしれない。
※ ベースの手順としては、以下のリンクの k8s の部分を使用している。
http://aaabbb-200904.hatenablog.jp/entry/2018/04/28/215922
TF のインストーラーは docker コンテナのダウンロード以外に、パッケージインストール等を実施している。
※ こちらで試した際には、yum, pip で実施されていた
基本的には、上記のツールがproxy を使用するように設定していけばよい (export http_proxy=x.x.x.x:3128 など) のだが、
これ以外に、kubeadm init, kubeadm join も上記環境変数の影響を受けるようなので、no_proxy 等の設定も必要となった。
以下に、必要となった設定をまとめていく。
※ proxy の ip, port は 172.31.12.136, 3128 として記載
(configure_instances.yml 前に必要な設定)
1. /etc/yum.conf の最後尾に以下を追記(全ノード)
proxy=http://172.31.12.136:3128

2. /root/.bashrc の最後尾に以下を追記(全ノード)
export http_proxy=http://172.31.12.136:3128
export https_proxy=http://172.31.12.136:3128
export no_proxy=localhost,127.0.0.1,172.31.1.193,172.31.15.21
※ 172.31.1.193,172.31.15.21 は、それぞれ masterノード, slaveノードのip

3. config/instance.yaml内で、contrail_configuration 内に、以下の2行を追記(playbook実行ノード)
 contrail_configuration:
  HTTPS_PROXY: 172.31.12.136:3128
  HTTP_PROXY: 172.31.12.136:3128

x. git でインストーラーを取得する場合、以下も実施(playbook実行ノード)
$ git config --global http.proxy http://172.31.12.136:3128
$ git config --global https.proxy http://172.31.12.136:3128
上記設定により、configure_instance.yml のplaybook が通るようになるはずである。
(install_contrail.yml前に必要な設定)
1. config/instance.yaml内で、以下の2行を削除(playbook実行ノード)
 contrail_configuration:
  HTTPS_PROXY: 172.31.12.136:3128
  HTTP_PROXY: 172.31.12.136:3128
※ こちらが残ったままだと、TF内の各 api 通信がproxy経由になる事象が発生し、一部のプロセスが上がらなくなった

2. docker サービスにプロキシを設定(全ノード)
# cp -i /usr/lib/systemd/system/docker.service /etc/systemd/system/
# vi /etc/systemd/system/docker.service
(ExecStart の行の前に以下を追記)
Environment="HTTP_PROXY=http://172.31.12.136:3128"
# systemctl daemon-reload
# systemctl restart docker
上記設定後、install_contrail.yml の playbook を流すことで、インストールが完了することを確認できた。

analytics機能無しでのインストールを行った場合の動作
Tungsten Fabric の analytics は、アラーム、可視化などの多くの有用な機能を提供するが、既に監視の仕組みが別途あるような場合には、analytics 無しで、control / vrouter 等の機能だけを、使いたいケースもあるかもしれない。
この場合を想定して、controller / analytics / analyticsdb のうち、controller だけでのデプロイを試してみている。
設定方法は、以下のリンクのk8sの場合と同様だが、インストール時の設定としては以下を使用している
http://aaabbb-200904.hatenablog.jp/entry/2018/04/28/215922
※ リンク先と比べて、analytics, analytics_database の2行を削除している
provider_config:
  bms:
   ssh_user: root
   ssh_public_key: /root/.ssh/id_rsa.pub
   ssh_private_key: /root/.ssh/id_rsa
   domainsuffix: local
instances:
  bms1:
   provider: bms
   roles:
      config_database:
      config:
      control:
      webui:
      k8s_master:
      kubemanager:
   ip: 172.31.15.99
  bms2:
   provider: bms
   roles:
     vrouter:
     k8s_node:
   ip: 172.31.1.148
contrail_configuration:
  CONTAINER_REGISTRY: opencontrailnightly
  CONTRAIL_VERSION: latest
  KUBERNETES_CLUSTER_PROJECT: {}
インストールが終わった後、contrail-status を実行したところ、以下の結果となった。
※ collector への接続が張れない状態となっている
(master)
[root@ip-172-31-15-99 ~]# contrail-status
Pod         Service         Original Name                          State    Status
config      api             contrail-controller-config-api         running  Up About an hour
config      cassandra       contrail-external-cassandra            running  Up About an hour
config      device-manager  contrail-controller-config-devicemgr   running  Up About an hour
config      nodemgr         contrail-nodemgr                       running  Up About an hour
config      rabbitmq        contrail-external-rabbitmq             running  Up About an hour
config      schema          contrail-controller-config-schema      running  Up About an hour
config      svc-monitor     contrail-controller-config-svcmonitor  running  Up About an hour
config      zookeeper       contrail-external-zookeeper            running  Up About an hour
control     control         contrail-controller-control-control    running  Up About an hour
control     dns             contrail-controller-control-dns        running  Up About an hour
control     named           contrail-controller-control-named      running  Up About an hour
control     nodemgr         contrail-nodemgr                       running  Up About an hour
kubernetes  kube-manager    contrail-kubernetes-kube-manager       running  Up About an hour
webui       job             contrail-controller-webui-job          running  Up About an hour
webui       web             contrail-controller-webui-web          running  Up About an hour

== Contrail control ==
control: initializing (Collector connection down)
nodemgr: initializing (Collector connection down)
named: active
dns: active

== Contrail config ==
api: initializing (Collector connection down)
zookeeper: active
svc-monitor: initializing (Collector connection down)
nodemgr: initializing (Collector connection down)
device-manager: initializing (Collector connection down)
cassandra: active
rabbitmq: active
schema: initializing (Collector connection down)

== Contrail webui ==
web: active
job: active

== Contrail kubernetes ==
kube-manager: initializing (Collector connection down)

[root@ip-172-31-15-99 ~]#

(slave)
[root@ip-172-31-1-148 ~]# contrail-status
Pod      Service  Original Name           State    Status
vrouter  agent    contrail-vrouter-agent  running  Up About an hour
vrouter  nodemgr  contrail-nodemgr        running  Up About an hour

vrouter kernel module is PRESENT
== Contrail vrouter ==
nodemgr: initializing (Collector connection down)
agent: active (Collector connection down)

[root@ip-172-31-1-148 ~]#
webui を開いてみたところ、Monitor の部分は、ほとんどの値が取得できない状態になっているが、Configure の部分は、通常通り、動作する状態となった。


また、この状態で、cirros2つをk8s上に作成してみたところ、特に問題なく疎通が可能となった。
control / config / vrouter だけが関連する部分については、一応動いているように見える。
[root@ip-172-31-15-99 1_initial]# kubectl get pod -o wide
NAME      READY     STATUS    RESTARTS   AGE       IP              NODE
cirros1   1/1       Running   0          31s       10.47.255.251   ip-172-31-1-148.ap-northeast-1.compute.internal
cirros2   1/1       Running   0          27s       10.47.255.250   ip-172-31-1-148.ap-northeast-1.compute.internal
[root@ip-172-31-15-99 1_initial]#
[root@ip-172-31-15-99 1_initial]#
[root@ip-172-31-15-99 1_initial]# kubectl exec -it cirros1 sh
/ # ping 10.47.255.250
PING 10.47.255.250 (10.47.255.250): 56 data bytes
64 bytes from 10.47.255.250: seq=0 ttl=63 time=0.421 ms
64 bytes from 10.47.255.250: seq=1 ttl=63 time=0.080 ms
^C
--- 10.47.255.250 ping statistics ---
2 packets transmitted, 2 packets received, 0% packet loss
round-trip min/avg/max = 0.080/0.250/0.421 ms
/ #
/ #
/ #
/ # [root@ip-172-31-15-99 1_initial]#
[root@ip-172-31-15-99 1_initial]#
メモリ使用量も、analytics ありの場合と比べてかなり抑えられていたので、メモリ制限が厳しく、alarm 等を設定する必要が無い場合は、こちらの構成であれば、動作させられるのかもしれない。
※ analytics 無しの場合
[root@ip-172-31-15-99 1_initial]# free -h
              total        used        free      shared  buff/cache   available
Mem:            15G        5.9G        4.1G         18M        5.5G        9.0G
Swap:            0B          0B          0B
[root@ip-172-31-15-99 1_initial]#

※ analytics 有りの場合
[root@ip-172-31-7-53 ~]# free -h
              total        used        free      shared  buff/cache   available
Mem:            15G         11G        247M         18M        3.5G        3.1G
Swap:            0B          0B          0B
[root@ip-172-31-7-53 ~]#
contrail-status, nodemgr, analytics
Tungsten Fabric では、contrail-status というコマンドで、各コンポーネントのステータスを確認することが出来る。
こちらの動作と、実際に、ステータス情報を提供するnodemgr について、ざっくりとまとめていく。
合わせて nodemgr 等からの情報を集約管理する、analytics という機能についてもまとめておく。
contrail-status, nodemgr
contrail-status の実体は以下のpython スクリプトとなっており、スクリプト内で、プロセスの有無、systemctl の結果、nodemgr の応答、等を取得し、各コンポーネントの状況を出力している。
https://github.com/Juniper/contrail-controller/blob/master/src/config/utils/contrail-status.py
[root@ip-172-31-7-53 ~]# contrail-status
Pod         Service         Original Name                          State    Status
analytics   alarm-gen       contrail-analytics-alarm-gen           running  Up 14 minutes
analytics   api             contrail-analytics-api                 running  Up 14 minutes
analytics   collector       contrail-analytics-collector           running  Up 14 minutes
analytics   nodemgr         contrail-nodemgr                       running  Up 14 minutes
analytics   query-engine    contrail-analytics-query-engine        running  Up 14 minutes
config      api             contrail-controller-config-api         running  Up 16 minutes
config      cassandra       contrail-external-cassandra            running  Up 18 minutes
config      device-manager  contrail-controller-config-devicemgr   running  Up 16 minutes
config      nodemgr         contrail-nodemgr                       running  Up 16 minutes
config      rabbitmq        contrail-external-rabbitmq             running  Up 18 minutes
config      schema          contrail-controller-config-schema      running  Up 16 minutes
config      svc-monitor     contrail-controller-config-svcmonitor  running  Up 16 minutes
config      zookeeper       contrail-external-zookeeper            running  Up 18 minutes
control     control         contrail-controller-control-control    running  Up 15 minutes
control     dns             contrail-controller-control-dns        running  Up 15 minutes
control     named           contrail-controller-control-named      running  Up 15 minutes
control     nodemgr         contrail-nodemgr                       running  Up 15 minutes
database    cassandra       contrail-external-cassandra            running  Up 14 minutes
database    kafka           contrail-external-kafka                running  Up 14 minutes
database    nodemgr         contrail-nodemgr                       running  Up 14 minutes
database    zookeeper       contrail-external-zookeeper            running  Up 14 minutes
kubernetes  kube-manager    contrail-kubernetes-kube-manager       running  Up About a minute
webui       job             contrail-controller-webui-job          running  Up 16 minutes
webui       web             contrail-controller-webui-web          running  Up 16 minutes

== Contrail control ==
control: active
nodemgr: initializing (NTP state unsynchronized.)
named: active
dns: active

== Contrail kubernetes ==
kube-manager: active

== Contrail database ==
kafka: active
nodemgr: initializing (Disk for DB is too low. NTP state unsynchronized.)
zookeeper: active
cassandra: active

== Contrail analytics ==
nodemgr: initializing (NTP state unsynchronized.)
api: active
collector: active
query-engine: active
alarm-gen: active

== Contrail webui ==
web: active
job: active

== Contrail config ==
api: active
zookeeper: active
svc-monitor: active
nodemgr: initializing (Disk for DB is too low. NTP state unsynchronized.)
device-manager: active
cassandra: active
rabbitmq: active
schema: active

[root@ip-172-31-7-53 ~]#
このうち、nodemgr は、各ノード上の常駐プロセスとして動作しており、実体としては、以下のファイルになる。
https://github.com/Juniper/contrail-controller/tree/master/src/nodemgr/common
※ プロセスの有無だけでなく、cassandra の状態、CPU, Mem, Disk の使用量、コアファイル出力の有無、ntpの設定状況、等も確認しているようである
また、contrail-status はnodemgr からNodeの状態を取得する際、以下のようなHTTPリクエストを発行している。
http://(nodemgr-ip:port)/Snh_SandeshUVECacheReq?x=NodeStatus
コマンドではなく、HTTP クライアントから情報取得を行いたい場合、上記のURLにリクエストを投げることでも、データの取得が可能となる。
※ vrouter上で、vrouter-nodemgr のポートに対して実行した場合:
[root@ip-172-31-10-212 ~]# curl localhost:8085/Snh_SandeshUVECacheReq?x=NodeStatus
<?xml-stylesheet type="text/xsl" href="/universal_parse.xsl"?><__NodeStatusUVE_list type="slist"><NodeStatusUVE type="sandesh"><data type="struct" identifier="1"><NodeStatus><name type="string" identifier="1" key="ObjectVRouter">ip-172-31-10-212.ap-northeast-1.compute.internal</name><process_status type="list" identifier="4" aggtype="union"><list type="struct" size="1"><ProcessStatus><module_id type="string" identifier="1">contrail-vrouter-agent</module_id><instance_id type="string" identifier="2">0</instance_id><state type="string" identifier="3">Functional</state><connection_infos type="list" identifier="4"><list type="struct" size="3"><ConnectionInfo><type type="string" identifier="1">XMPP</type><name type="string" identifier="2">control-node:172.31.7.53</name><server_addrs type="list" identifier="3"><list type="string" size="1"><element>172.31.7.53:5269</element></list></server_addrs><status type="string" identifier="4">Up</status><description type="string" identifier="5">OpenSent</description></ConnectionInfo><ConnectionInfo><type type="string" identifier="1">XMPP</type><name type="string" identifier="2">dns-server:172.31.7.53</name><server_addrs type="list" identifier="3"><list type="string" size="1"><element>172.31.7.53:53</element></list></server_addrs><status type="string" identifier="4">Up</status><description type="string" identifier="5">OpenSent</description></ConnectionInfo><ConnectionInfo><type type="string" identifier="1">Collector</type><name type="string" identifier="2"></name><server_addrs type="list" identifier="3"><list type="string" size="1"><element>172.31.7.53:8086</element></list></server_addrs><status type="string" identifier="4">Up</status><description type="string" identifier="5">Established</description></ConnectionInfo></list></connection_infos><description type="string" identifier="5"></description></ProcessStatus></list></process_status></NodeStatus></data></NodeStatusUVE><SandeshUVECacheResp type="sandesh"><returned type="u32" identifier="1">1</returned><period type="i32" identifier="2">0</period><more type="bool" identifier="0">false</more></SandeshUVECacheResp></__NodeStatusUVE_list>[root@ip-172-31-10-212 ~]#
[root@ip-172-31-10-212 ~]#
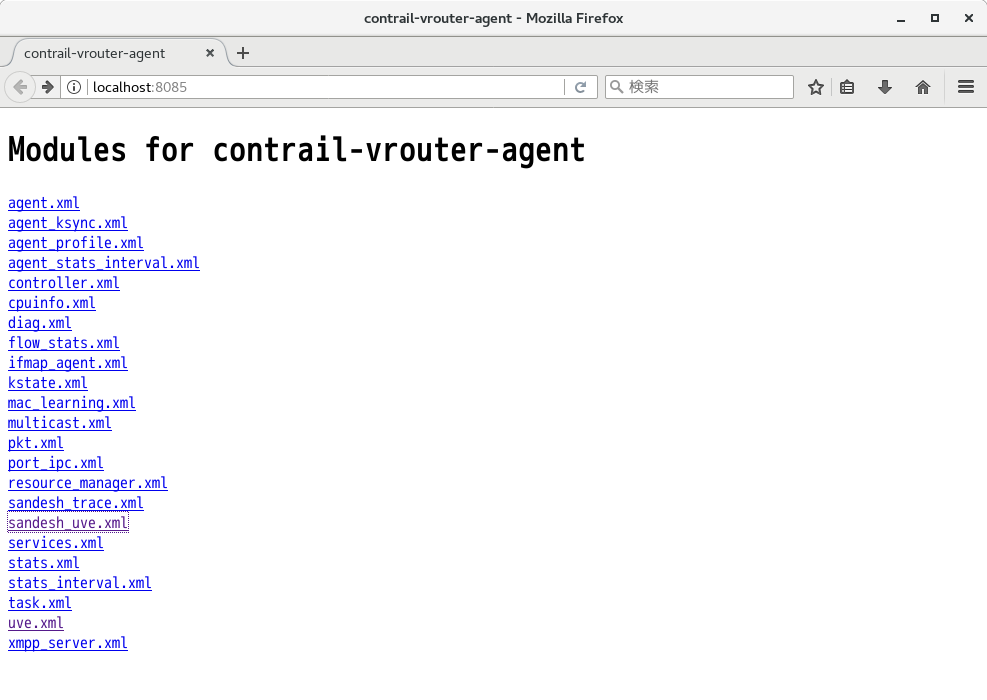
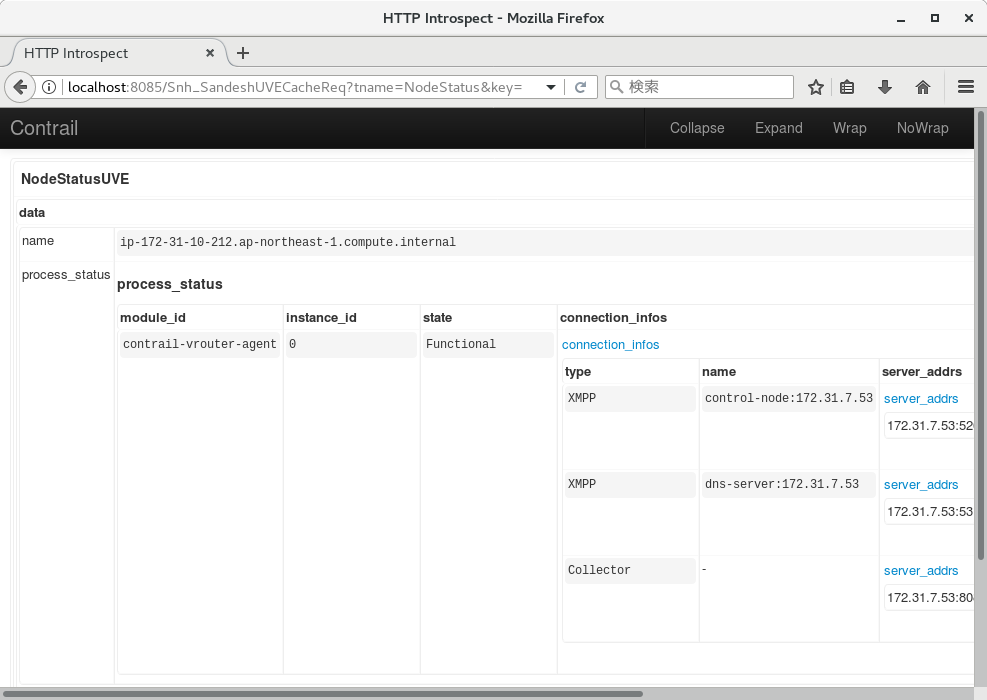
また、上記のポートにブラウザでアクセスすることで、画面から同じリクエストを投げることもできるようになっている。
1. vrouterの8085番ポートにアクセスし、sandesh_uve.xml を選択
2. SandeshUVECacheReq に tname: NodeStatus を入力
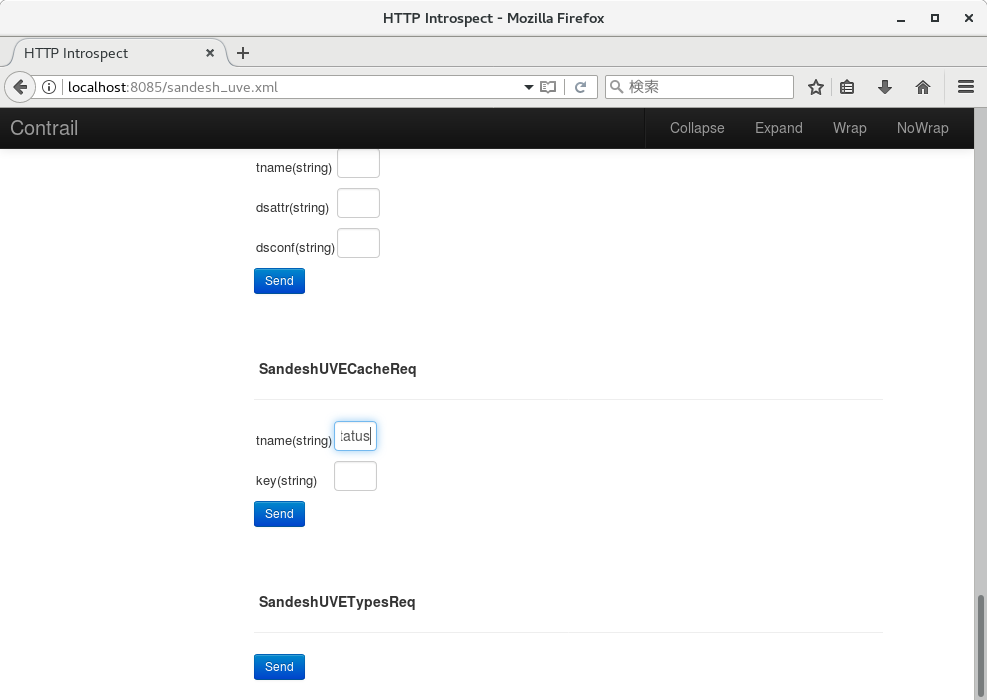
3. 上記と同じ情報が出力される
analytics
また、上記のNodeStatus の結果を含む、各コンポーネントの状態や、パフォーマンス値は、Sandesh というプロトコル (実体はThrift) で、Tungsten Fabric のanalytics に送付されている。
http://www.opencontrail.org/sandesh-a-sdn-analytics-interface/
analytics では、contrail-collector というプロセスが動いており、送付された値を cassandra に書き込む動作となっている。
このため、各ノードのNodeStatus をまとめて確認したい場合、analyticsに対して処理を投げることでも、確認が可能となる。
analytics への処理の投げ方は、cli経由, webui経由, API経由の3つがある。
cli経由で値を取得する場合、contrail-flows, contrail-logs, contrail-stats などのコマンドが用意されており、それぞれ、analytics 内のflow, log, stat といった情報を取得出来る。
https://github.com/Juniper/contrail-controller/wiki/Contrail-utility-scripts-for-getting-logs,-stats-and-flows-from-analytics
※ 実体は、以下の3ファイルに対応する
https://github.com/Juniper/contrail-analytics/blob/master/contrail-opserver/flow.py
https://github.com/Juniper/contrail-analytics/blob/master/contrail-opserver/log.py
https://github.com/Juniper/contrail-analytics/blob/master/contrail-opserver/stats.py
※※ ちなみに、4.1以降では、session という値が追加され、contrail-sessions というコマンドも追加されていた
https://github.com/Juniper/contrail-specs/blob/master/session_collection.md
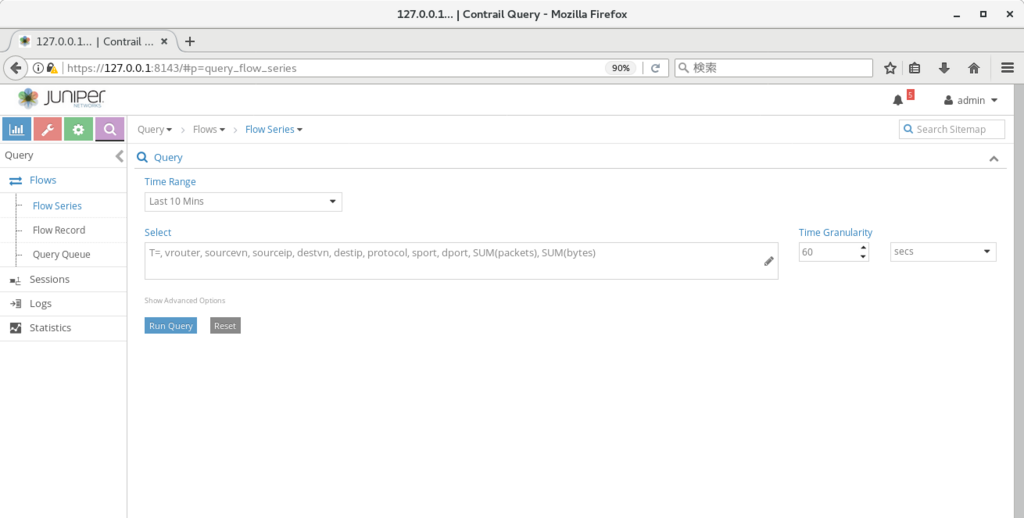
webui では、Query の画面内に、Flow, Log, Stat といったタブが存在しており、上記のcli に対応した内容が取得出来る。
※ APIで投げる場合は、以下のリンクを参照
https://github.com/Juniper/contrail-controller/wiki/Contrail-Analytics-Documentation
NodeStatus については、UVEという扱いになっており、上記のcli の中では、contrail-logs で、ステータス変化時のログを取得出来る。
※ UVE の動作については、以下を参照
http://www.opencontrail.org/operational-state-in-the-opencontrail-system-uve-user-visible-entities-through-analytics-api/
https://github.com/Juniper/contrail-analytics/blob/master/contrail-opserver/docs/opserver.rst
※ control-node の場合
[root@ip-172-31-7-53 ~]# docker exec -it analytics_api_1 contrail-logs --object-type control-node --last 1m
2018 May 19 09:50:19.426686 ip-172-31-7-53.ap-northeast-1.compute.internal [:contrail-control-nodemgr:] : NodeStatusUVE: [NodeStatus: name = ip-172-31-7-53.ap-northeast-1.compute.internal, disk_usage_info: {/dev/xvda1: [partition_type = xfs, partition_space_used_1k = 5917572, partition_space_available_1k = 25528424, percentage_partition_space_used = 19], }, process_mem_cpu_usage: {contrail-control: [mem_virt = 34528, cpu_share = 0.05, mem_res = 16832], contrail-control-nodemgr: [mem_virt = 45792, cpu_share = 0.57, mem_res = 26360], contrail-dns: [mem_virt = 32068, cpu_share = 0.04, mem_res = 14544], contrail-named: [mem_virt = 21168, cpu_share = 0.0, mem_res = 21160], }, [SysMemInfo: total = 16265888, used = 12171632, free = 262316, buffers = 2600, cached = 3829340, node_type = control-node], [SysCpuInfo: one_min_avg = 0.92, five_min_avg = 1.36, fifteen_min_avg = 1.42, cpu_share = 6.26, node_type = control-node]]
[root@ip-172-31-7-53 ~]#

※ vrouter の場合
[root@ip-172-31-7-53 ~]# docker exec -it analytics_api_1 contrail-logs --object-type vrouter --last 1m --message-type NodeStatusUVE
2018 May 19 09:53:32.427291 ip-172-31-10-212.ap-northeast-1.compute.internal [:contrail-vrouter-nodemgr:] : NodeStatusUVE: [NodeStatus: name = ip-172-31-10-212.ap-northeast-1.compute.internal, disk_usage_info: {/dev/xvda1: [partition_type = xfs, partition_space_used_1k = 3161708, partition_space_available_1k = 28284288, percentage_partition_space_used = 10], }, process_mem_cpu_usage: {contrail-vrouter-agent: [mem_virt = 218252, cpu_share = 0.47, mem_res = 122904], contrail-vrouter-nodemgr: [mem_virt = 60320, cpu_share = 0.4, mem_res = 26260], }, [SysMemInfo: total = 16265888, used = 705984, free = 14651512, buffers = 2600, cached = 905792, node_type = vrouter], [SysCpuInfo: one_min_avg = 0.07, five_min_avg = 0.09, fifteen_min_avg = 0.08, cpu_share = 0.35, node_type = vrouter]]
[root@ip-172-31-7-53 ~]#
また、UVEについて、最新のステータスを確認する場合には、curl 等を使って、以下のようにanalytics-nodeの8081番ポートにHTTP GETを投げることで、状態を取得することができる。
※ UVEのリストを確認
[root@ip-172-31-7-53 ~]# curl localhost:8081/analytics/uves | python -m json.tool
  % Total    % Received % Xferd  Average Speed   Time    Time     Time  Current
                                 Dload  Upload   Total   Spent    Left  Speed
100  3108  100  3108    0     0   381k      0 --:--:-- --:--:-- --:--:--  433k
[
    {
        "href": "http://localhost:8081/analytics/uves/storage-pools",
        "name": "storage-pools"
    },
    {
        "href": "http://localhost:8081/analytics/uves/xmpp-peers",
        "name": "xmpp-peers"
    },
    {
        "href": "http://localhost:8081/analytics/uves/storage-clusters",
        "name": "storage-clusters"
    },
(snip)

※ control node のリストを確認
[root@ip-172-31-7-53 ~]# curl localhost:8081/analytics/uves/control-nodes | python -m json.tool
  % Total    % Received % Xferd  Average Speed   Time    Time     Time  Current
                                 Dload  Upload   Total   Spent    Left  Speed
100   173  100   173    0     0  19983      0 --:--:-- --:--:-- --:--:-- 21625
[
    {
        "href": "http://localhost:8081/analytics/uves/control-node/ip-172-31-7-53.ap-northeast-1.compute.internal?flat",
        "name": "ip-172-31-7-53.ap-northeast-1.compute.internal"
    }
]

※ 特定のcontrol node について、値を取得
[root@ip-172-31-7-53 ~]# curl localhost:8081/analytics/uves/control-node/ip-172-31-7-53.ap-northeast-1.compute.internal?flat | python -m json.tool
  % Total    % Received % Xferd  Average Speed   Time    Time     Time  Current
                                 Dload  Upload   Total   Spent    Left  Speed
100  6547    0  6547    0     0   790k      0 --:--:-- --:--:-- --:--:--  913k
{
    "BgpRouterState": {
        "__T": 1526722031429953,
        "admin_down": false,
        "amqp_conn_info": {
            "connection_status": true,
            "connection_status_change_at": "2018-May-19 09:12:10.534881",
            "url": "amqp://guest:guest@172.31.7.53:5672"
        },
        "bgp_router_ip_list": [
            "172.31.7.53"
        ],
(snip)
    "NodeStatus": {
        "__T": 1526729660881411,
        "build_info": "{\"build-info\" : [{\"build-version\" : \"5.1.0\", \"build-time\" : \"2018-05-19 02:35:01.870887\", \"build-user\" : \"zuul\", \"build-hostname\" : \"centos-7-4-builder-juniper-contrail-ci-c-0000046385.novalocal\", \"build-id\" : \"5.1.0-107.el7\", \"build-number\" : \"@contrail\"}]}",
        "deleted": false,
        "disk_usage_info": {
            "/dev/xvda1": {
                "partition_space_available_1k": 25205956,
                "partition_space_used_1k": 6240040,
                "partition_type": "xfs",
                "percentage_partition_space_used": 20
            }
        },
        "installed_package_version": "5.1.0-107.el7",
(snip)
        "process_status": [
            {
                "description": "NTP state unsynchronized.",
                "instance_id": "0",
                "module_id": "contrail-control-nodemgr",
                "state": "Non-Functional"
            },
            {
                "connection_infos": [
                    {
                        "description": "Established",
(snip)
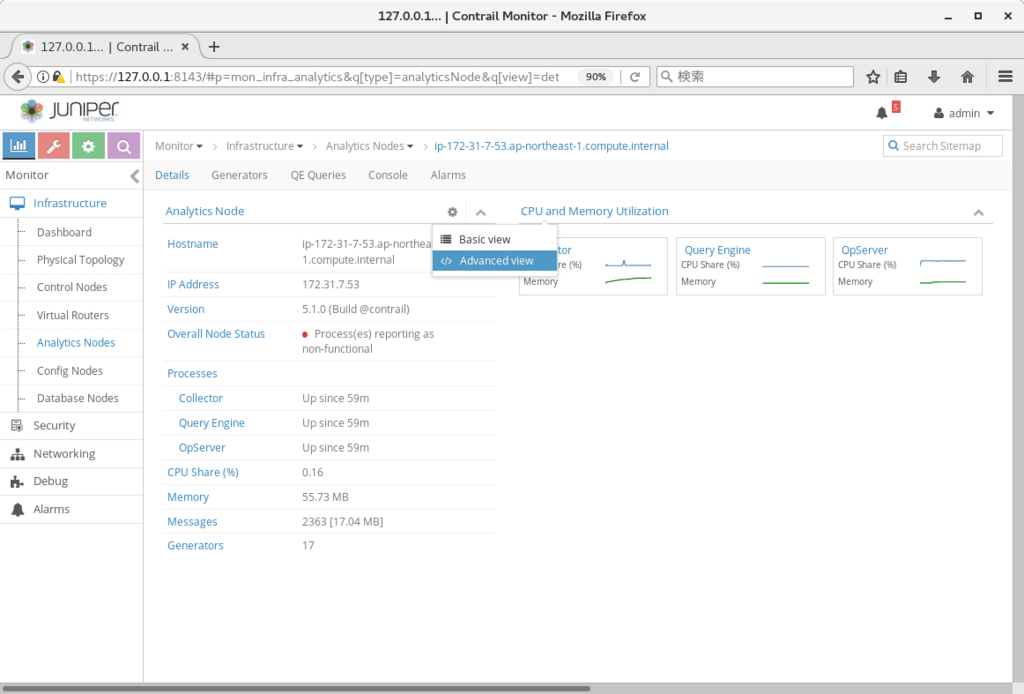
また、NodeStatus を webui から確認する場合、
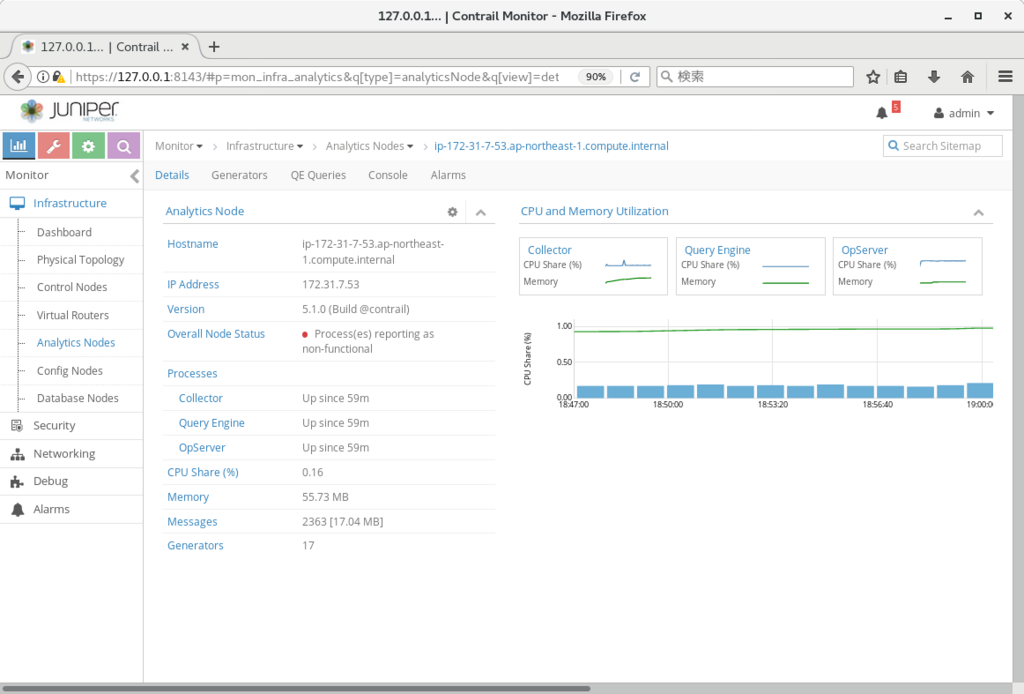
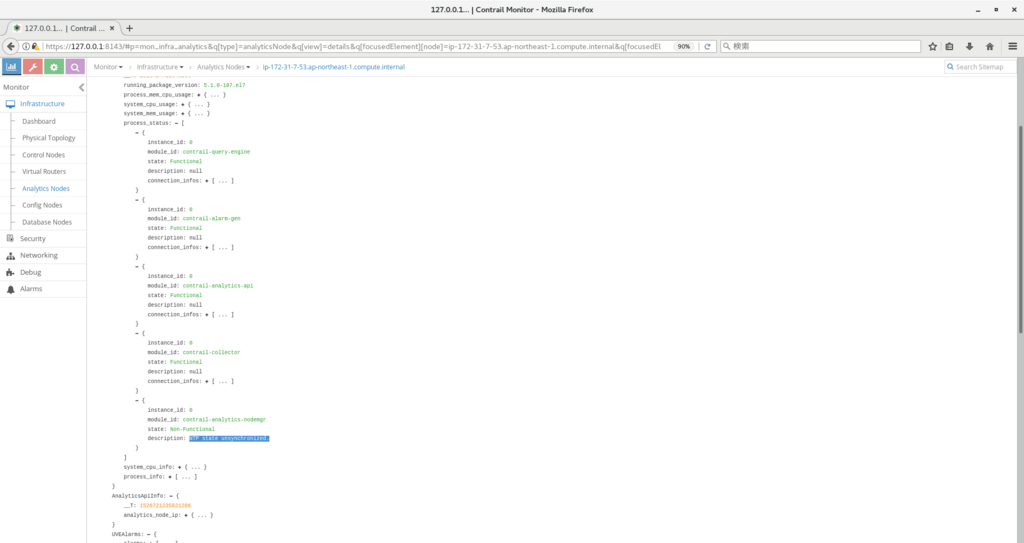
Monitor > Infrastructure > (ノード種別) > (ノード名) で、'Advanced View' を選ぶことでも確認可能となる。
※ 下記では、Analytics Nodes で process status を確認し、process reporting as non-functional となっている原因を確認している
gatewayless, distributed snat
Tungsten Fabric の4.1 以降では、gatewayless という機能が加わっている。
https://github.com/Juniper/contrail-specs/blob/master/gateway-less-forwarding.md
通常、Tungsten Fabric では、外部とのアクセスを行うためにはexternal router (L3VPNの機能が必要) を使う必要があるのだが、gatewayless の機能を使うと、上記の機能を持つルーターが無くとも、直接外部とのやり取りを行うことができるようになる。
設定方法としては、k8s でインストールを行った後、仮想ネットワーク (以下では、k8s-default-pod-network) に対して、 Advanced Options > IP Fabric Forwarding の設定を行う。

この設定により、該当のVN上の pod から、computeと同じサブネットにあるノードに対して、pingが届くようになっていることを確認できる。
※ aws上で試す場合、EC2メニューの、ネットワークインターフェースで、送信元/送信先の変更チェック、を無効にする必要があった。
(pod: 10.47.255.251からpingを発行)
/ # ping 172.31.8.163

[root@ip-172-31-8-163 ~]# tcpdump -i eth0 -n icmp
tcpdump: verbose output suppressed, use -v or -vv for full protocol decode
listening on eth0, link-type EN10MB (Ethernet), capture size 262144 bytes
14:34:58.240730 IP 10.47.255.251 > 172.31.8.163: ICMP echo request, id 62208, seq 301, length 64
14:34:58.240762 IP 172.31.8.163 > 10.47.255.251: ICMP echo reply, id 62208, seq 301, length 64
14:34:59.240821 IP 10.47.255.251 > 172.31.8.163: ICMP echo request, id 62208, seq 302, length 64
14:34:59.240850 IP 172.31.8.163 > 10.47.255.251: ICMP echo reply, id 62208, seq 302, length 64
14:35:00.240955 IP 10.47.255.251 > 172.31.8.163: ICMP echo request, id 62208, seq 303, length 64
14:35:00.240991 IP 172.31.8.163 > 10.47.255.251: ICMP echo reply, id 62208, seq 303, length 64
(snip)
また、以下のように、pingを受けるノードに static routeを定義することで、pingが戻ってくることも確認できた。
※ ip は、それぞれ、 172.31.8.163: master, 172.31.6.88: slave (pingを発行しているpodが稼働している) となる
[root@ip-172-31-8-163 ~]# route add -host 10.47.255.251 gw 172.31.6.88
[root@ip-172-31-8-163 ~]#

/ # ping 172.31.8.163
PING 172.31.8.163 (172.31.8.163): 56 data bytes
64 bytes from 172.31.8.163: seq=0 ttl=63 time=0.629 ms
64 bytes from 172.31.8.163: seq=1 ttl=63 time=0.465 ms
^C
--- 172.31.8.163 ping statistics ---
2 packets transmitted, 2 packets received, 0% packet loss
round-trip min/avg/max = 0.465/0.547/0.629 ms
/ #
また、5.0以降のバージョンでは、仮想ネットワークからの通信に対して、computeのipへのSNATを行い、直接外部への通信を行わせる仕組みが追加されている。
https://github.com/Juniper/contrail-specs/blob/master/distributed-snat.md
こちらの機能を有効化する場合、仮想ネットワークで、Advanced Options > SNAT の有効化、を行う。
※ 例では、default-k8s-pod-network で実施

この変更により、pod内のcirrosから、直接computeから到達できるip (例では 8.8.8.8) にpingが飛ぶようになる。
/ # ip -o a
1: lo: <LOOPBACK,UP,LOWER_UP> mtu 65536 qdisc noqueue qlen 1\    link/loopback 00:00:00:00:00:00 brd 00:00:00:00:00:00
1: lo    inet 127.0.0.1/8 scope host lo\       valid_lft forever preferred_lft forever
1: lo    inet6 ::1/128 scope host \       valid_lft forever preferred_lft forever
13: eth0@if14: <BROADCAST,MULTICAST,UP,LOWER_UP,M-DOWN> mtu 1500 qdisc noqueue \    link/ether 02:f3:18:5d:a4:56 brd ff:ff:ff:ff:ff:ff
13: eth0    inet 10.47.255.251/12 scope global eth0\       valid_lft forever preferred_lft forever
13: eth0    inet6 fe80::e860:76ff:fedb:e0e2/64 scope link \       valid_lft forever preferred_lft forever
/ #
/ #
/ # ping 8.8.8.8
PING 8.8.8.8 (8.8.8.8): 56 data bytes
64 bytes from 8.8.8.8: seq=0 ttl=48 time=1.951 ms
64 bytes from 8.8.8.8: seq=1 ttl=48 time=1.740 ms
^C
--- 8.8.8.8 ping statistics ---
2 packets transmitted, 2 packets received, 0% packet loss
round-trip min/avg/max = 1.740/1.845/1.951 ms
/ #
パッケージアップデートなどで、仮想ネットワーク内から、直接インターネットに出る必要がある場合などに使用出来る。
fw-policy, k8s labelによるタグ制御
Tungsten Fabricの4.1以降では、webui にSecurity, Tags といったタブが追加されている。
このタブは、fw-policy の設定に使用可能で、仮想ネットワーク間のアクセス制御や、vm間のアクセス制御に使用できる。
https://github.com/Juniper/contrail-controller/wiki/Contrail-FW-Security-enhancements
また、ポリシーの適用がvmi を通過したタイミングで実施されることから、同じ仮想ネットワーク内のvmに対するアクセス制御 (マイクロセグメンテーション) にも使用できる。
サンプルとして、k8s-default-pod-network に、cirros1/cirros2 を払いだし、こちらで制御を行ってみる。
※ yaml はこちらを使用: https://github.com/tnaganawa/contrail-k8s-tutorial/tree/master/yml/1_initial
[root@ip-172-31-8-163 1_initial]# kubectl get pod -o wide
NAME      READY     STATUS    RESTARTS   AGE       IP              NODE
cirros1   1/1       Running   0          13m       10.47.255.251   ip-172-31-6-88.ap-northeast-1.compute.internal
cirros2   1/1       Running   0          28s       10.47.255.250   ip-172-31-6-88.ap-northeast-1.compute.internal
[root@ip-172-31-8-163 1_initial]#
[root@ip-172-31-8-163 1_initial]# kubectl exec -it cirros1 sh
/ # ping 10.47.255.250
PING 10.47.255.250 (10.47.255.250): 56 data bytes
64 bytes from 10.47.255.250: seq=0 ttl=63 time=0.446 ms
64 bytes from 10.47.255.250: seq=1 ttl=63 time=0.079 ms
64 bytes from 10.47.255.250: seq=2 ttl=63 time=0.080 ms
64 bytes from 10.47.255.250: seq=3 ttl=63 time=0.079 ms
^C
--- 10.47.255.250 ping statistics ---
4 packets transmitted, 4 packets received, 0% packet loss
round-trip min/avg/max = 0.079/0.171/0.446 ms
/ #
まず、Configure > Tags > Global Tags から、各cirros に対応するタグ label: (pod名) を設定する。


また、Configure > Networking > Ports から、各port に タグを割り当てておく。


この後、Configure > Security > Global Policies から、Firewall Policies を選択し、

Create から、以下のようなfw-policy を設定する。


この後、Application Policy Sets に戻り、default-application-policy-set について、edit を実行し、Select Firewall Policy から、先ほどの policy1 の紐付けを実施する。
※ Application Tag として、application=k8s を指定する必要がある


実行後、policy によって、icmp がブロックされ、それ以外の通信が許可されていることを確認できる。
/ # ping 10.47.255.250
PING 10.47.255.250 (10.47.255.250): 56 data bytes
^C
--- 10.47.255.250 ping statistics ---
2 packets transmitted, 0 packets received, 100% packet loss
/ #
/ # ssh cirros@10.47.255.250
cirros@10.47.255.250's password:
$ ip -o a
1: lo: <LOOPBACK,UP,LOWER_UP> mtu 65536 qdisc noqueue qlen 1\    link/loopback 00:00:00:00:00:00 brd 00:00:00:00:00:00
1: lo    inet 127.0.0.1/8 scope host lo\       valid_lft forever preferred_lft forever
1: lo    inet6 ::1/128 scope host \       valid_lft forever preferred_lft forever
13: eth0@if14: <BROADCAST,MULTICAST,UP,LOWER_UP,M-DOWN> mtu 1500 qdisc noqueue \    link/ether 02:9e:23:8d:1a:56 brd ff:ff:ff:ff:ff:ff
13: eth0    inet 10.47.255.250/12 scope global eth0\       valid_lft forever preferred_lft forever
13: eth0    inet6 fe80::c25:33ff:fe16:4995/64 scope link \       valid_lft forever preferred_lft forever
$
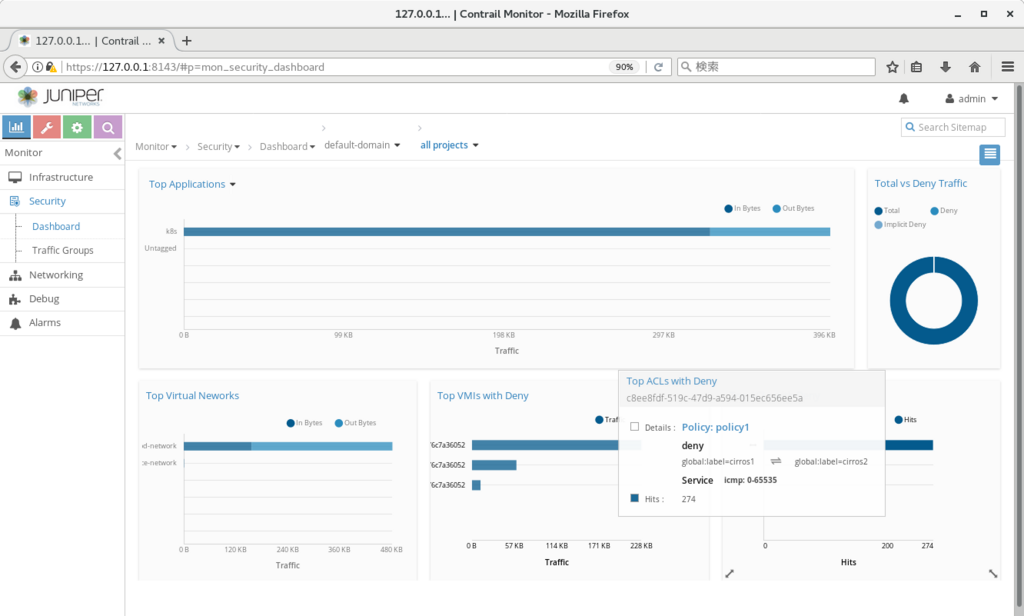
また、pingを実行した状態で、
Monitor > Security > Dashboard を開くことで、トラフィックがブロックされていることと、実際にブロックに使用されているポリシーを確認できる。
追記:
なお、タグの定義と、vmi へのタグの割り当ては、yaml 内のmetadata で実施することも出来る (TF5.0以降)
一旦cirros1/cirros2 を削除し、以下のようなyaml で作り直すと、タグの作成、およびタグの割り当てが自動で行われることを確認できた。
apiVersion: v1
kind: Pod
metadata:
  name: cirros1
  labels:
    name: cirros1
    label: cirros1   <-- 追記
spec:
  containers:
  - name: cirros1
    image: cirros
    ports:
      - containerPort: 22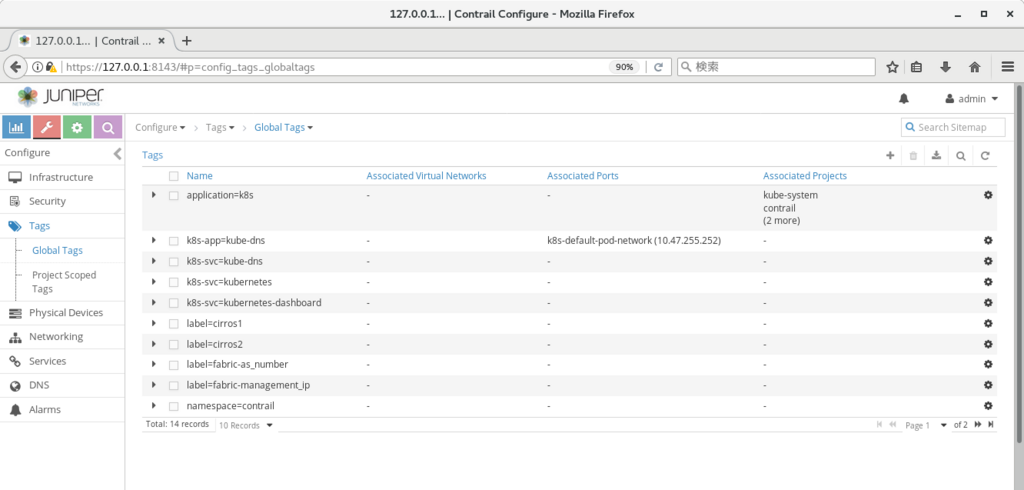

metadata ip address
Tungsten Fabric で vm/container 等を作った後、直接vm/containerにログインを行い、動作を確認したい場合がある。
この場合、vrouter上の各vmiに割り振られる、metadata ip address が使用できる。
※ k8sであれば、kubectl execも使用可能
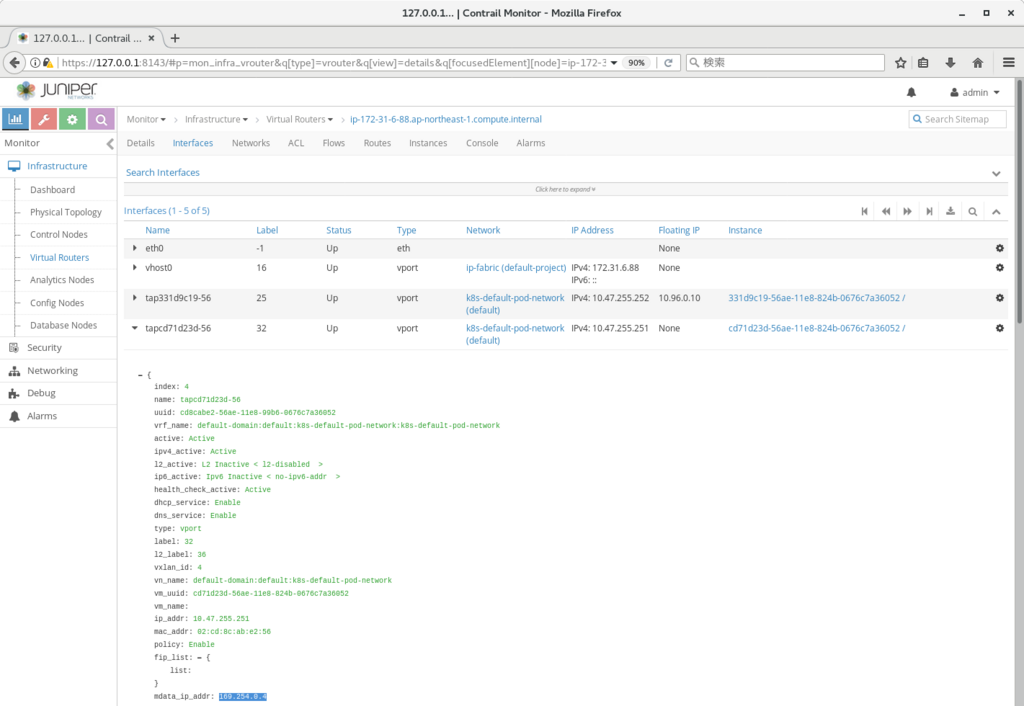
metadata ip address は、vrouter 上にvmi が払い出された際に、各vmi に割り振られる169.254.0.0/16 のipとなる。
vmi ごとの値は、Monitor > Infrastructure > Virtual Routers > (Virtual Router名) > Interfaces で、各vmi の mdata_ip_addr から確認できる
※ スクリーンショットは、cirros のコンテナを立てた際のもので、169.254.0.4 が払い出されていることがわかる
該当のipアドレスは、vrouter 上で route -n を発行すると、vhost0 へのroute が定義されており、vmへのアクセスに使用可能となる。
[root@ip-172-31-6-88 ~]# route -n
Kernel IP routing table
Destination     Gateway         Genmask         Flags Metric Ref    Use Iface
0.0.0.0         172.31.0.1      0.0.0.0         UG    0      0        0 vhost0
169.254.0.1     0.0.0.0         255.255.255.255 UH    0      0        0 vhost0
169.254.0.3     0.0.0.0         255.255.255.255 UH    0      0        0 vhost0
169.254.0.4     0.0.0.0         255.255.255.255 UH    0      0        0 vhost0
172.17.0.0      0.0.0.0         255.255.0.0     U     0      0        0 docker0
172.31.0.0      0.0.0.0         255.255.240.0   U     0      0        0 vhost0
[root@ip-172-31-6-88 ~]#
[root@ip-172-31-6-88 ~]#
[root@ip-172-31-6-88 ~]# ssh cirros@169.254.0.4
cirros@169.254.0.4's password:
$ ip -o a
1: lo: <LOOPBACK,UP,LOWER_UP> mtu 65536 qdisc noqueue qlen 1\    link/loopback 00:00:00:00:00:00 brd 00:00:00:00:00:00
1: lo    inet 127.0.0.1/8 scope host lo\       valid_lft forever preferred_lft forever
1: lo    inet6 ::1/128 scope host \       valid_lft forever preferred_lft forever
11: eth0@if12: <BROADCAST,MULTICAST,UP,LOWER_UP,M-DOWN> mtu 1500 qdisc noqueue \    link/ether 02:cd:8c:ab:e2:56 brd ff:ff:ff:ff:ff:ff
11: eth0    inet 10.47.255.251/12 scope global eth0\       valid_lft forever preferred_lft forever
11: eth0    inet6 fe80::c0e2:91ff:fe2e:f8e9/64 scope link \       valid_lft forever preferred_lft forever
$