fw-policy, k8s labelによるタグ制御
Tungsten Fabricの4.1以降では、webui にSecurity, Tags といったタブが追加されている。
このタブは、fw-policy の設定に使用可能で、仮想ネットワーク間のアクセス制御や、vm間のアクセス制御に使用できる。
https://github.com/Juniper/contrail-controller/wiki/Contrail-FW-Security-enhancements
また、ポリシーの適用がvmi を通過したタイミングで実施されることから、同じ仮想ネットワーク内のvmに対するアクセス制御 (マイクロセグメンテーション) にも使用できる。
サンプルとして、k8s-default-pod-network に、cirros1/cirros2 を払いだし、こちらで制御を行ってみる。
※ yaml はこちらを使用: https://github.com/tnaganawa/contrail-k8s-tutorial/tree/master/yml/1_initial
[root@ip-172-31-8-163 1_initial]# kubectl get pod -o wide
NAME      READY     STATUS    RESTARTS   AGE       IP              NODE
cirros1   1/1       Running   0          13m       10.47.255.251   ip-172-31-6-88.ap-northeast-1.compute.internal
cirros2   1/1       Running   0          28s       10.47.255.250   ip-172-31-6-88.ap-northeast-1.compute.internal
[root@ip-172-31-8-163 1_initial]#
[root@ip-172-31-8-163 1_initial]# kubectl exec -it cirros1 sh
/ # ping 10.47.255.250
PING 10.47.255.250 (10.47.255.250): 56 data bytes
64 bytes from 10.47.255.250: seq=0 ttl=63 time=0.446 ms
64 bytes from 10.47.255.250: seq=1 ttl=63 time=0.079 ms
64 bytes from 10.47.255.250: seq=2 ttl=63 time=0.080 ms
64 bytes from 10.47.255.250: seq=3 ttl=63 time=0.079 ms
^C
--- 10.47.255.250 ping statistics ---
4 packets transmitted, 4 packets received, 0% packet loss
round-trip min/avg/max = 0.079/0.171/0.446 ms
/ #
まず、Configure > Tags > Global Tags から、各cirros に対応するタグ label: (pod名) を設定する。


また、Configure > Networking > Ports から、各port に タグを割り当てておく。


この後、Configure > Security > Global Policies から、Firewall Policies を選択し、

Create から、以下のようなfw-policy を設定する。


この後、Application Policy Sets に戻り、default-application-policy-set について、edit を実行し、Select Firewall Policy から、先ほどの policy1 の紐付けを実施する。
※ Application Tag として、application=k8s を指定する必要がある


実行後、policy によって、icmp がブロックされ、それ以外の通信が許可されていることを確認できる。
/ # ping 10.47.255.250
PING 10.47.255.250 (10.47.255.250): 56 data bytes
^C
--- 10.47.255.250 ping statistics ---
2 packets transmitted, 0 packets received, 100% packet loss
/ #
/ # ssh cirros@10.47.255.250
cirros@10.47.255.250's password:
$ ip -o a
1: lo: <LOOPBACK,UP,LOWER_UP> mtu 65536 qdisc noqueue qlen 1\    link/loopback 00:00:00:00:00:00 brd 00:00:00:00:00:00
1: lo    inet 127.0.0.1/8 scope host lo\       valid_lft forever preferred_lft forever
1: lo    inet6 ::1/128 scope host \       valid_lft forever preferred_lft forever
13: eth0@if14: <BROADCAST,MULTICAST,UP,LOWER_UP,M-DOWN> mtu 1500 qdisc noqueue \    link/ether 02:9e:23:8d:1a:56 brd ff:ff:ff:ff:ff:ff
13: eth0    inet 10.47.255.250/12 scope global eth0\       valid_lft forever preferred_lft forever
13: eth0    inet6 fe80::c25:33ff:fe16:4995/64 scope link \       valid_lft forever preferred_lft forever
$
また、pingを実行した状態で、
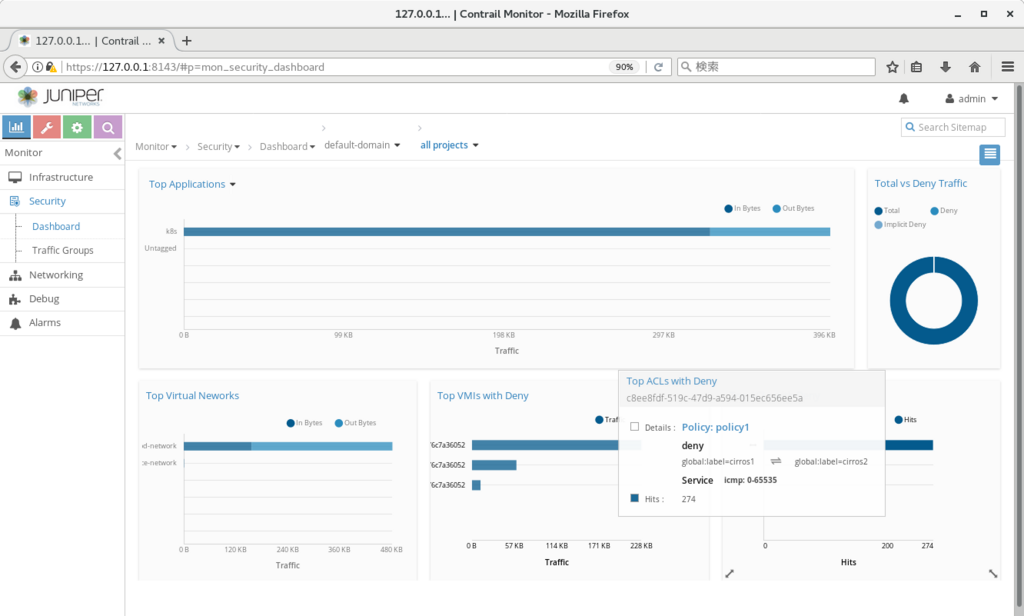
Monitor > Security > Dashboard を開くことで、トラフィックがブロックされていることと、実際にブロックに使用されているポリシーを確認できる。
追記:
なお、タグの定義と、vmi へのタグの割り当ては、yaml 内のmetadata で実施することも出来る (TF5.0以降)
一旦cirros1/cirros2 を削除し、以下のようなyaml で作り直すと、タグの作成、およびタグの割り当てが自動で行われることを確認できた。
apiVersion: v1
kind: Pod
metadata:
  name: cirros1
  labels:
    name: cirros1
    label: cirros1   <-- 追記
spec:
  containers:
  - name: cirros1
    image: cirros
    ports:
      - containerPort: 22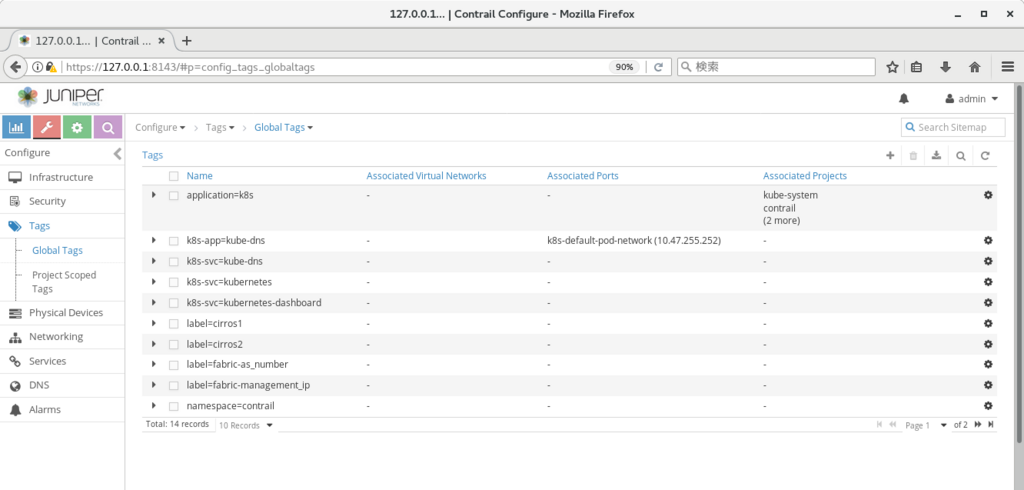

metadata ip address
Tungsten Fabric で vm/container 等を作った後、直接vm/containerにログインを行い、動作を確認したい場合がある。
この場合、vrouter上の各vmiに割り振られる、metadata ip address が使用できる。
※ k8sであれば、kubectl execも使用可能
metadata ip address は、vrouter 上にvmi が払い出された際に、各vmi に割り振られる169.254.0.0/16 のipとなる。
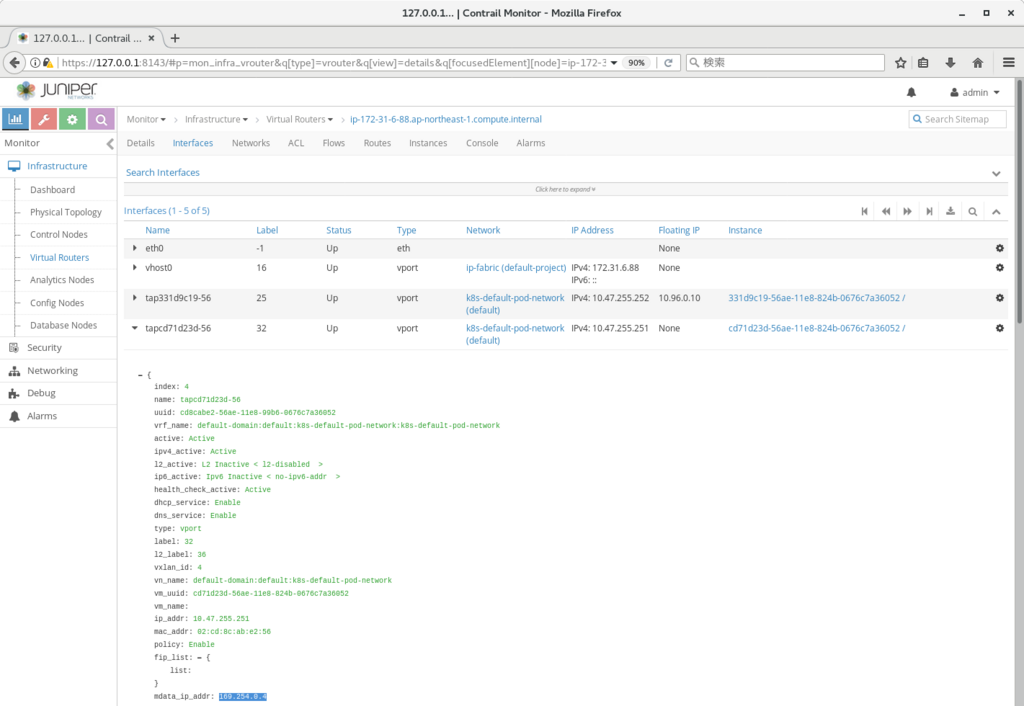
vmi ごとの値は、Monitor > Infrastructure > Virtual Routers > (Virtual Router名) > Interfaces で、各vmi の mdata_ip_addr から確認できる
※ スクリーンショットは、cirros のコンテナを立てた際のもので、169.254.0.4 が払い出されていることがわかる
該当のipアドレスは、vrouter 上で route -n を発行すると、vhost0 へのroute が定義されており、vmへのアクセスに使用可能となる。
[root@ip-172-31-6-88 ~]# route -n
Kernel IP routing table
Destination     Gateway         Genmask         Flags Metric Ref    Use Iface
0.0.0.0         172.31.0.1      0.0.0.0         UG    0      0        0 vhost0
169.254.0.1     0.0.0.0         255.255.255.255 UH    0      0        0 vhost0
169.254.0.3     0.0.0.0         255.255.255.255 UH    0      0        0 vhost0
169.254.0.4     0.0.0.0         255.255.255.255 UH    0      0        0 vhost0
172.17.0.0      0.0.0.0         255.255.0.0     U     0      0        0 docker0
172.31.0.0      0.0.0.0         255.255.240.0   U     0      0        0 vhost0
[root@ip-172-31-6-88 ~]#
[root@ip-172-31-6-88 ~]#
[root@ip-172-31-6-88 ~]# ssh cirros@169.254.0.4
cirros@169.254.0.4's password:
$ ip -o a
1: lo: <LOOPBACK,UP,LOWER_UP> mtu 65536 qdisc noqueue qlen 1\    link/loopback 00:00:00:00:00:00 brd 00:00:00:00:00:00
1: lo    inet 127.0.0.1/8 scope host lo\       valid_lft forever preferred_lft forever
1: lo    inet6 ::1/128 scope host \       valid_lft forever preferred_lft forever
11: eth0@if12: <BROADCAST,MULTICAST,UP,LOWER_UP,M-DOWN> mtu 1500 qdisc noqueue \    link/ether 02:cd:8c:ab:e2:56 brd ff:ff:ff:ff:ff:ff
11: eth0    inet 10.47.255.251/12 scope global eth0\       valid_lft forever preferred_lft forever
11: eth0    inet6 fe80::c0e2:91ff:fe2e:f8e9/64 scope link \       valid_lft forever preferred_lft forever
$
L2-only virtual-network
Tungsten の仮想ネットワークは、通常、L3の動作を含んだものとなる。
例えば、vrouter が提供するgwのipに対しては、仮想ネットワーク内のvmからは、常にping が飛ぶ状態となっている。
ただし、Tungsten の仮想ネットワーク定義は、これ以外に、L2だけを提供するための設定も存在する。
https://bugs.launchpad.net/juniperopenstack/+bug/1471637
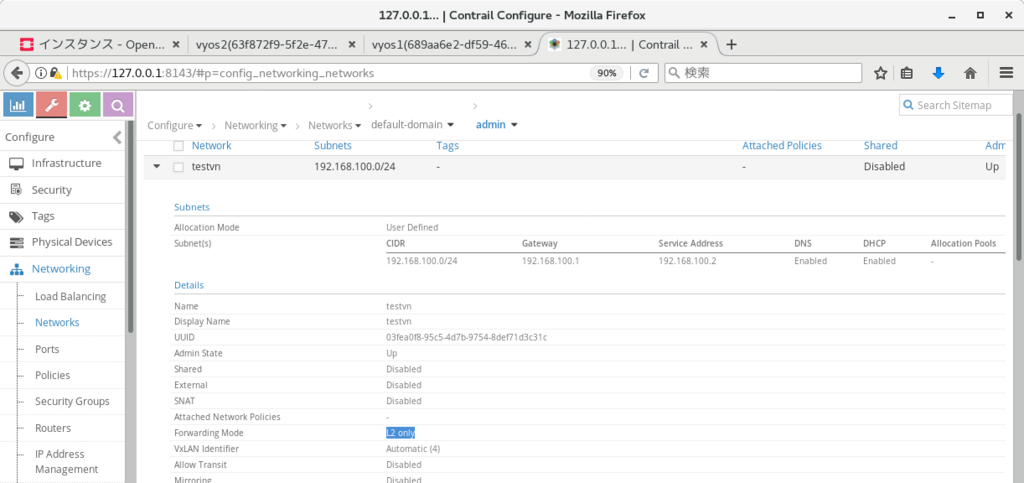
※ 設定方法としては以下の通り、仮想ネットワークの定義から、Advanced Options > Forwarding Mode > L2 Only を選択する
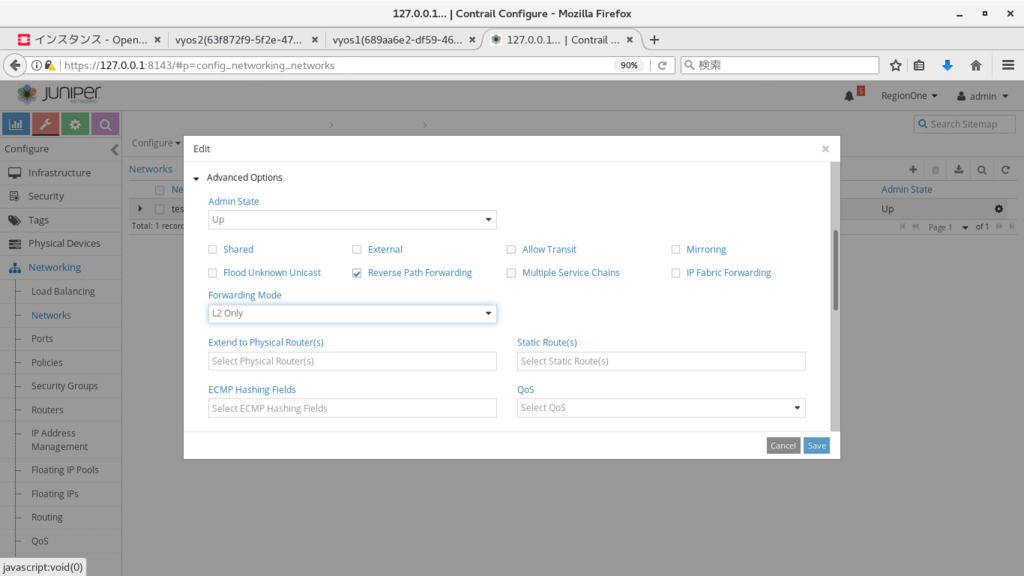
このモードの仮想ネットワークでは、vrouter はルーターとしての機能を提供しなくなり、L2 ブリッジと同様に振る舞う。
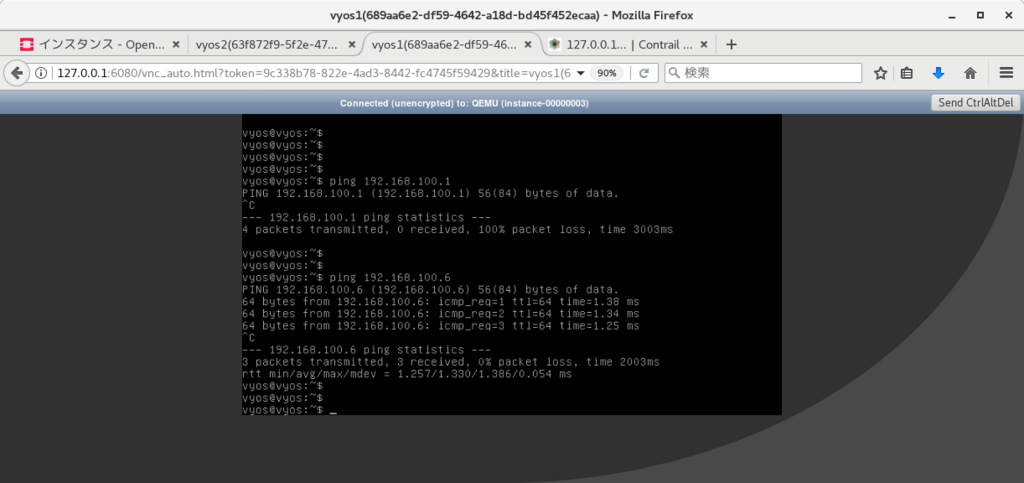
※ このため、gw ip へのping や、dhcpでのip付与、compute からの 169.254.0.x への ssh 等は使用できなくなる。
この場合も、手動で各 vm に ip を割り振れば、vm 間の疎通は、通常通り可能となる。
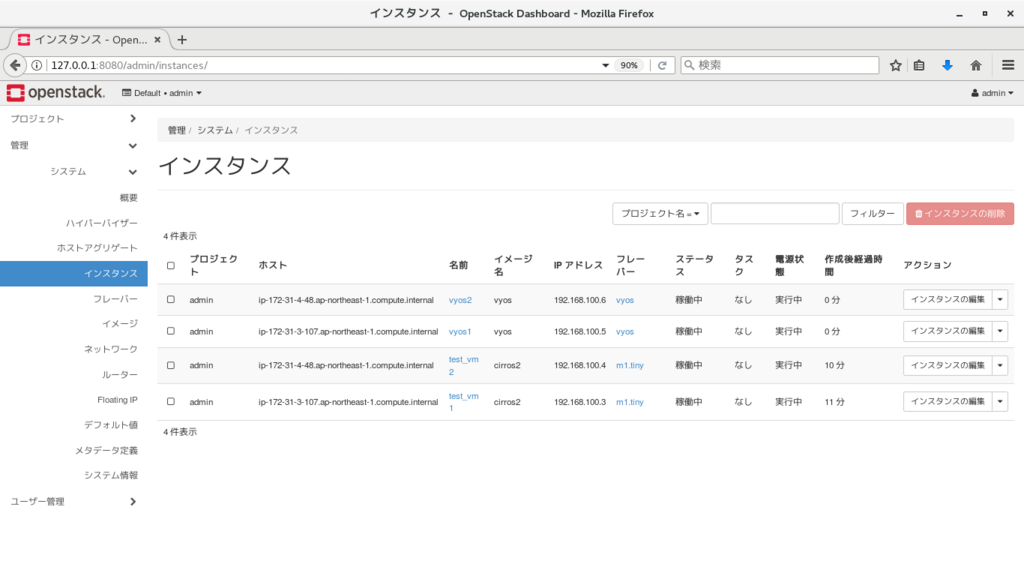
※ 以下では、以前構築したkolla openstack (compute は2台に増やしている)
http://aaabbb-200904.hatenablog.jp/entry/2018/04/28/215922
の仮想ネットワークをL2 Onlyに変更し、2台立ち上げたvyos で、お互いにping が飛ぶことを確認している。
(vyos1) set interface ethernet eth1 address 192.168.100.5/24
(vyos2) set interface ethernet eth1 address 192.168.100.6/24
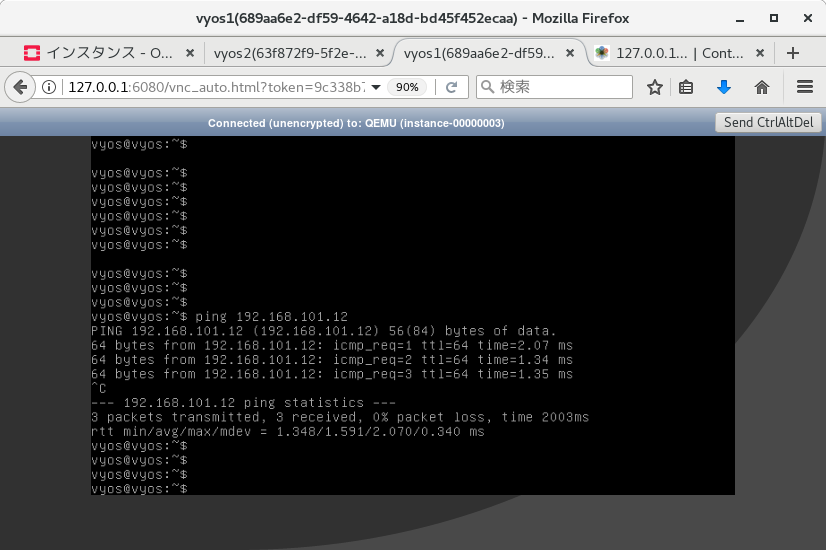
また、この場合のvlan タグの動作だが、片方のVNFから出てきた際についたタグは、(compute をまたいだ場合も) そのまま伝搬され、仮想ネットワーク内の別vmに到達可能、という結果となった。
※ 2台のvyos に同じvlan インターフェースをつけてping を実行することで確認
(vyos1) set interfaces ethernet eth1 vif 101 address 192.168.101.11/24
(vyos2) set interfaces ethernet eth1 vif 101 address 192.168.101.12/24
また、compute上でパケットキャプチャを行った場合も、行き、帰りともに vlan タグがついていることを確認できた。
[root@ip-172-31-3-107 ~]# tcpdump -i tap47a437bf-15 -n -e
tcpdump: verbose output suppressed, use -v or -vv for full protocol decode
listening on tap47a437bf-15, link-type EN10MB (Ethernet), capture size 262144 bytes
15:05:12.108450 02:47:a4:37:bf:15 > 02:b6:3c:4f:35:fa, ethertype 802.1Q (0x8100), length 102: vlan 101, p 0, ethertype IPv4, 192.168.101.11 > 192.168.101.12: ICMP echo request, id 3878, seq 1, length 64
15:05:12.109455 02:b6:3c:4f:35:fa > 02:47:a4:37:bf:15, ethertype 802.1Q (0x8100), length 102: vlan 101, p 0, ethertype IPv4, 192.168.101.12 > 192.168.101.11: ICMP echo reply, id 3878, seq 1, length 64
15:05:13.110547 02:47:a4:37:bf:15 > 02:b6:3c:4f:35:fa, ethertype 802.1Q (0x8100), length 102: vlan 101, p 0, ethertype IPv4, 192.168.101.11 > 192.168.101.12: ICMP echo request, id 3878, seq 2, length 64
15:05:13.111306 02:b6:3c:4f:35:fa > 02:47:a4:37:bf:15, ethertype 802.1Q (0x8100), length 102: vlan 101, p 0, ethertype IPv4, 192.168.101.12 > 192.168.101.11: ICMP echo reply, id 3878, seq 2, length 64
^C
4 packets captured
4 packets received by filter
0 packets dropped by kernel
[root@ip-172-31-3-107 ~]#
vlan subinterface
Tungsten Fabric では、VNFからvlanタグがついたパケットが送出された場合に、別の仮想ネットワークにパケットを入れる、という制御が実施できる。
多数のVRFで同じVNFを共有する場合、等に活用できるのではなかろうか。
※ 設定方法としては、以下の動画の通り、設定を行いたいポートで、'Add Subinterface' をクリックし、VNに紐付ける、という内容となる。
https://www.youtube.com/watch?v=ANhBQe_DS2E
k8sのrollout機能
kubernetes では、rollout という機能で、無停止でのアプリケーション更新を実施できる。(deployment定義時に使用可能)
https://kubernetes.io/docs/concepts/workloads/controllers/deployment/
今回は、TF上のdeploymentで上記を行った場合に、アプリケーションが停止するタイミングが発生しないことを確認する。
実施内容としては、以下のサンプルyaml 2つを使って、deployment / service を定義し、
https://github.com/tnaganawa/contrail-k8s-tutorial/blob/master/yml/3_contrail-cni-features/3_ingress/nginx-deployment.yaml
https://github.com/tnaganawa/contrail-k8s-tutorial/blob/master/yml/3_contrail-cni-features/3_ingress/nginx-svc.yaml
[root@ip-172-31-4-195 ~]# kubectl get pod -o wide
NAME                                READY     STATUS    RESTARTS   AGE       IP              NODE
cirros1                             1/1       Running   0          7m        10.47.255.248   ip-172-31-9-61.ap-northeast-1.compute.internal
nginx-deployment-85f794d94b-cxp4p   1/1       Running   0          4m        10.47.255.250   ip-172-31-9-61.ap-northeast-1.compute.internal
nginx-deployment-85f794d94b-m9zrb   1/1       Running   0          4m        10.47.255.247   ip-172-31-9-61.ap-northeast-1.compute.internal
[root@ip-172-31-4-195 ~]#

[root@ip-172-31-4-195 ~]# kubectl get svc
NAME         TYPE        CLUSTER-IP      EXTERNAL-IP   PORT(S)   AGE
kubernetes   ClusterIP   10.96.0.1       <none>        443/TCP   2h
nginx-svc    ClusterIP   10.99.250.199   <none>        80/TCP    9m
[root@ip-172-31-4-195 ~]#
以下のコマンドでコンテナのrollout を実施している。
# kubectl edit deployment/nginx-deployment
 (container image のバージョンを変更: 1.7.9 -> 1.9.2)
適用がうまくいった場合、新規のcontainerが作成され、古いバージョンのcontainerが停止される、という動作となる。
※ 更新状況は、以下のように確認が可能
[root@ip-172-31-4-195 3_ingress]# kubectl rollout status deployment/nginx-deployment
Waiting for rollout to finish: 1 out of 2 new replicas have been updated...
Waiting for rollout to finish: 1 out of 2 new replicas have been updated...
Waiting for rollout to finish: 1 out of 2 new replicas have been updated...
Waiting for rollout to finish: 1 old replicas are pending termination...
Waiting for rollout to finish: 1 old replicas are pending termination...
deployment "nginx-deployment" successfully rolled out
[root@ip-172-31-4-195 3_ingress]#
あわせて、cirros のpod を1台作成し、1秒ごとにserviceのipに対してcurl を発行し、アクセスが途切れないことを確認している。
※ TFでは、container の増減に合わせてbgp経路の更新を行っているのだが、rollout のように新規のコンテナが作られた後、古いコンテナが削除される、という動作についても、特に問題なく追随出来るらしい
/ # while true; do date; curl -I 10.99.250.199 2> /dev/null  | head -n 1 ; sleep 1; done
Thu May  3 10:24:52 UTC 2018
HTTP/1.1 200 OK
Thu May  3 10:24:53 UTC 2018
HTTP/1.1 200 OK
Thu May  3 10:24:54 UTC 2018
HTTP/1.1 200 OK
(snip)
TF上でpacemakerを動かしてみたときの動作
Tungsten のarp対応ロジックは、HAクラスタ等で使われる gratuitous arp にも対応している。
https://github.com/Juniper/contrail-controller/wiki/Contrail-VRouter-ARP-Processing
サンプルとして、k8s上のcentos7で、pacemakerを動かして動作を確認してみている。
※ pacemaker の設定については、以下を参照:
https://access.redhat.com/documentation/ja-jp/red_hat_enterprise_linux/7/html/high_availability_add-on_administration/ch-startup-haaa
準備として、まず、以下のようなyaml を使って、systemd 使用可能な centos pod を2つ (以下、centos1, centos2) 作成する。
apiVersion: v1
kind: Pod
metadata:
  name: centos1
  labels:
    name: centos1
spec:
  containers:
  - name: centos1
    image: centos/systemd
    securityContext:
privileged: trueこのあと、以下のようなコマンドを順に発行し、haクラスタの構成を行う。
yum install pacemaker pcs which
passwd hacluster
systemctl start pcsd.service
vi /etc/hosts
 (/etc/hosts に centos1/centos2 のipをそれぞれ追記)
pcs cluster auth centos1 centos2
 (先ほど設定した、haclusterユーザーのパスワードを入力)
pcs cluster setup --start --name cluster1 centos1 centos2
pcs property set stonith-enabled=false
pcs cluster enable --all
※ なお、yum でパッケージの取得を行う際には、default:k8s-default-pod-network で、Advanced Option > SNAT にチェックをつける必要がある。
https://github.com/Juniper/contrail-specs/blob/master/distributed-snat.md
この後、クラスタにresource の定義を実施し、vipを設定する。
pcs resource create VirtualIP IPaddr2 ip=10.47.255.11 cidr_netmask=24
うまくクラスタが設定されると、ステータス確認で以下のような出力が得られる。
[root@centos1 /]# pcs status
Cluster name: cluster1
WARNING: no stonith devices and stonith-enabled is not false
Stack: corosync
Current DC: centos2 (version 1.1.16-12.el7_4.8-94ff4df) - partition with quorum
Last updated: Thu May  3 07:42:56 2018
Last change: Thu May  3 07:41:51 2018 by root via cibadmin on centos2

2 nodes configured
1 resource configured

Online: [ centos1 centos2 ]

Full list of resources:

 VirtualIP	(ocf::heartbeat:IPaddr2):	Started centos1

Daemon Status:
  corosync: active/enabled
  pacemaker: active/enabled
  pcsd: active/disabled
[root@centos1 /]#
また、resourceが起動しているcentos1 に、vip が付与されていることを確認しておく。
[root@centos1 /]# ip -o a
1: lo    inet 127.0.0.1/8 scope host lo\       valid_lft forever preferred_lft forever
1: lo    inet6 ::1/128 scope host \       valid_lft forever preferred_lft forever
9: eth0    inet 10.47.255.251/12 scope global eth0\       valid_lft forever preferred_lft forever
9: eth0    inet 10.47.255.11/24 scope global eth0\       valid_lft forever preferred_lft forever
9: eth0    inet6 fe80::80a6:33ff:fedb:b209/64 scope link \       valid_lft forever preferred_lft forever
[root@centos1 /]#
この状態で、同じサブネットに cirros を立ち上げてvip にping を発行するのだが、ここまでの設定だと、TF 上で許可設定が無いため、pingが飛ばない状態になる。
/ # ip -o a
1: lo: <LOOPBACK,UP,LOWER_UP> mtu 65536 qdisc noqueue qlen 1\    link/loopback 00:00:00:00:00:00 brd 00:00:00:00:00:00
1: lo    inet 127.0.0.1/8 scope host lo\       valid_lft forever preferred_lft forever
1: lo    inet6 ::1/128 scope host \       valid_lft forever preferred_lft forever
15: eth0@if16: <BROADCAST,MULTICAST,UP,LOWER_UP,M-DOWN> mtu 1500 qdisc noqueue \    link/ether 02:fa:bb:e6:12:4e brd ff:ff:ff:ff:ff:ff
15: eth0    inet 10.47.255.250/12 scope global eth0\       valid_lft forever preferred_lft forever
15: eth0    inet6 fe80::58f0:7aff:fe95:ee89/64 scope link \       valid_lft forever preferred_lft forever
/ #
/ #
/ #
/ # ping 10.47.255.11
PING 10.47.255.11 (10.47.255.11): 56 data bytes
^C
--- 10.47.255.11 ping statistics ---
2 packets transmitted, 0 packets received, 100% packet loss
/ #
centos1 用のvmi に、vip (ここでは、10.47.255.11) の使用を許可するには、webui の、Configure > Networking > Ports から、'Advanced Option > Allowed Address Pair' を使って、許可を行う必要がある。


設定後、以下のようにping が飛ぶようになる。
※ 同様に centos2 の方のport にもallowed address pair を設定しておく。
/ # ping 10.47.255.11
PING 10.47.255.11 (10.47.255.11): 56 data bytes
64 bytes from 10.47.255.11: seq=0 ttl=63 time=1.031 ms
64 bytes from 10.47.255.11: seq=1 ttl=63 time=0.492 ms
^C
--- 10.47.255.11 ping statistics ---
2 packets transmitted, 2 packets received, 0% packet loss
round-trip min/avg/max = 0.492/0.761/1.031 ms
/ #
また、以下のコマンドで、HAクラスタのresource の移動を行い、centos2 に移った場合も、ping が飛ぶことを確認しておく。
[root@centos1 ~]# pcs resource move VirtualIP centos2
[root@centos1 ~]# pcs status
Cluster name: cluster1
Stack: corosync
Current DC: centos2 (version 1.1.16-12.el7_4.8-94ff4df) - partition with quorum
Last updated: Thu May  3 08:07:42 2018
Last change: Thu May  3 08:07:36 2018 by root via crm_resource on centos1

2 nodes configured
1 resource configured

Online: [ centos1 centos2 ]

Full list of resources:

 VirtualIP	(ocf::heartbeat:IPaddr2):	Started centos2

Daemon Status:
  corosync: active/enabled
  pacemaker: active/enabled
  pcsd: active/disabled
[root@centos1 ~]#
この後、cirrosからvipにping を打ちながら、切り替えを行う、という対応を実施してみたのだが、上記で使用している、k8s デフォルトの仮想ネットワーク(default:k8s-default-pod-network) の場合、なぜか切り替えに10秒程度かかる事象が発生した、、(原因不明だが、k8s-default-pod-network には、いくつかk8s用のポリシーが設定されていることと、/12と広いサブネットが設定されていること、等が関係しているかもしれない)
このため、以下の内容で、別途仮想ネットワークを作成し、再度、同じ切り替えを実施してみている。
Name: vn1
Subnet: 10.0.1.0/24
この場合、切り替え時のパケットロスは1秒程度、という結果になった。
/ # ping 10.0.1.11
PING 10.0.1.11 (10.0.1.11): 56 data bytes
64 bytes from 10.0.1.11: seq=0 ttl=64 time=0.446 ms
64 bytes from 10.0.1.11: seq=1 ttl=64 time=0.054 ms
64 bytes from 10.0.1.11: seq=2 ttl=64 time=0.082 ms
64 bytes from 10.0.1.11: seq=3 ttl=64 time=0.058 ms  : centos1 -> centos2 の切り替えを実施
64 bytes from 10.0.1.11: seq=5 ttl=64 time=1.342 ms
64 bytes from 10.0.1.11: seq=6 ttl=64 time=0.482 ms
64 bytes from 10.0.1.11: seq=7 ttl=64 time=0.661 ms
64 bytes from 10.0.1.11: seq=8 ttl=64 time=0.574 ms
64 bytes from 10.0.1.11: seq=9 ttl=64 time=0.597 ms
64 bytes from 10.0.1.11: seq=10 ttl=64 time=0.538 ms
64 bytes from 10.0.1.11: seq=11 ttl=64 time=0.571 ms
64 bytes from 10.0.1.11: seq=12 ttl=64 time=0.532 ms  : centos2 -> centos1 の切り替えを実施
64 bytes from 10.0.1.11: seq=14 ttl=64 time=0.337 ms
64 bytes from 10.0.1.11: seq=15 ttl=64 time=0.051 ms
64 bytes from 10.0.1.11: seq=16 ttl=64 time=0.075 ms
64 bytes from 10.0.1.11: seq=17 ttl=64 time=0.074 ms
^C
--- 10.0.1.11 ping statistics ---
18 packets transmitted, 16 packets received, 11% packet loss
round-trip min/avg/max = 0.051/0.404/1.342 ms
/ #
上記の結果を見る限り、(環境に合わせて工夫は必要だが) 現在同じような方法でHAクラスタを組んでいる部分についても、仮想ネットワークに移せる可能性がある、といえるのではなかろうか。
TungstenFabricとVyOSのBGPaaS
Tungsten Fabric の機能の一つに、BGPaaS という機能がある。
※ ユースケースとしては以下を参照
https://blueprints.launchpad.net/juniperopenstack/+spec/bgp-as-a-service
https://blueprints.launchpad.net/juniperopenstack/+spec/bgp-as-a-service-v2
https://networkop.co.uk/blog/2018/01/02/os-contrail/
今回は、以前構築した k8s+TF4.0 の環境で、
( http://aaabbb-200904.hatenablog.jp/entry/2017/10/15/034243 )
vyos のコンテナを動かし、実際にvrouterとvyos間でbgpがつながり、VRF内の経路がVNFに挿入されることを確認してみる。
※ テスト用の構成であり、実際のユースケースを想定したものではないので、念のため
まず、TFのwebuiから、仮想ネットワークを以下の情報で作成する。
name: vn1
subnet: 10.0.1.0/24
その後、vyos 用のコンテナを、以下の内容で作成する。
※ command と privileged: true を指定しないと、うまく起動できないので注意
apiVersion: v1
kind: Pod
metadata:
  name: vyos1
  labels:
    name: vyos1
  annotations: {
    "opencontrail.org/network" : '{"domain":"default-domain", "project": "default", "name":"vn1"}'
  }
spec:
  containers:
  - name: vyos1
    image: 2stacks/vyos
    command:
      - /sbin/init
    securityContext:
      privileged: true
このあと、vyos 側で以下のコンフィグを投入し、vrouter の gw と、bgp を設定する。
# kubectl exec -it vyos1 vbash
# su - vyos
> configure
# set protocols bgp 65311 neighbor 10.0.1.1 remote-as 64512
# commit
# exit
合わせて、TF側では、以下のように、BGPaaSの設定を実施する。
Configure > Services > BGP as a Service > Create

name: bgpaas11
autonomous system: 65311
virtual machine interface: (vyosのvmiを選択)
advanced options > ip address: 10.0.1.3 (vyosのipを記載)
advanced options > hold time: 180

うまくいくと、以下のように、vyos 側でbgpがEstablished になり、TF 内の経路を受け取っていることが確認できる。
vyos@vyos:~$ show ip bgp summary
BGP router identifier 10.0.1.3, local AS number 65311
IPv4 Unicast - max multipaths: ebgp 1 ibgp 1
RIB entries 1, using 96 bytes of memory
Peers 1, using 4560 bytes of memory

Neighbor        V    AS MsgRcvd MsgSent   TblVer  InQ OutQ Up/Down  State/PfxRcd
10.0.1.1        4 64512       4       5        0    0    0 00:01:11        1

Total number of neighbors 1
vyos@vyos:~$

vyos@vyos:~$ show ip route
Codes: K - kernel route, C - connected, S - static, R - RIP, O - OSPF,
       I - ISIS, B - BGP, > - selected route, * - FIB route

K>* 0.0.0.0/0 via 10.0.1.1, eth0
C>* 10.0.1.0/24 is directly connected, eth0
B>* 10.0.1.3/32 [20/100] via 10.0.1.1, eth0, 00:00:24     <-- TF VRF内の経路がVNFに挿入されている
C>* 127.0.0.0/8 is directly connected, lo
vyos@vyos:~$
また、TF側からは、Monitor > Infrastructure > Control Nodes > (control node名) > Peers から、BGP peerの状態を確認できる。
